MY KOMBUCHA JOURNEY
I am a type 2 Diabetic with Gastroparesis (which is, in my case, a partial paralysis of the stomach). The Gastroparesis is irreversible, yet fortunately my digestion issues, which can be very painful and debilitating at times, can be helped along with proper diet and nutrition. This is how I found Kombucha. So far, so good, I love what Kombucha is doing for me, not only in gut health, but with energy. An added bonus, is that I love the taste!

(this is a picture of my homebrewed Blueberry Kombucha that I sipped on this morning)
WHAT IS KOMBUCHA?
There are lots of definitions on the internet, but in a nutshell, it is a fermented black and/or green tea that uses a SCOBY: symbiotic culture of bacteria and yeast (that mushroom-looking thing).

(a new baby Scoby)
WHY SHOULD WE DRINK KOMBUCHA?
It is so good for you!
Because it’s naturally fermented with a living colony of bacteria and yeast, Kombucha is a probiotic beverage. It has a myriad of benefits such as improved digestion, fighting candida (harmful yeast) overgrowth, mental clarity, and mood stability.
WHAT DOES IT TASTE LIKE?
Plain Kombucha tastes like fizzy apple soda with a slightly sour tang. You can flavor your Kombucha in a second fermentation process with fruits, juices and/or herbs.
My first taste, I puckered my lips. But it grew on me...by the time I was done with my first bottle, I realized that I had really enjoyed it, even more so than Coca Cola, my favorite pop. It didn't give the sugar rush and downfall of Coke either.

WHY SHOULD I BREW MY OWN?
Because it is pricey at the grocery stores - about $4 per 16oz. bottle.
You can make it for pennies at home and it's very easy.
SUPPLIES TO BREW YOUR OWN KOMBUCHA
1. A Scoby and Starter Tea
These can be purchased off of the internet, but you may want to search your local area for any Kombucha Brewers. I found a sweet lady selling the Scoby and Starter Tea at our Farmer's Market. Or you might be able to find a friend who will give you one!

(this is a Scoby and Starter tea that I gave to my good friend, Lori, to start her own brew)
2. A Glass Gallon Jar
I now have two Kombucha brews going, so I use a glass cookie jar that I already had, and I bought a gallon Ball jar at Walmart.
3. Eight Black and/or Green Tea Bags (no flavors!)
I recommend starting with only black tea bags until you are used to brewing Kombucha, then you can experiment by adding in green tea.
Never, ever, use flavored teas for your first fermentation process!


(I cut off the paper tags, and tie the tea bags together)
4. Organic Cane Sugar
(Don't worry about the sugar content, the scoby eats it!)
(Don't worry about the sugar content, the scoby eats it!)
5. Glass Bottles with Tight Fitting Lids
I recommend using bottles specifically for brewing Kombucha or Beer. We purchased wide mouth (for adding fruit pieces) and swing top glass bottles with smaller necks (for adding juice). We purchased both of these through Amazon. You can also use Ball or Mason jars, but sometimes they let the carbonation slip out.

6. A Stainless Steel or Glass Pot for Boiling Water
7. Tight Woven Cotton Cloth to Cover your Gallon Container
I just cut up an old pillow case.
8. A Large Rubber Band
DIRECTIONS TO FIRST FERMENTATION
A. Make sure all of the supplies are very clean
Do NOT use anti-bacterial soap, this will kill the good bacteria and yeast.
Simply wash supplies in regular dish soap and then rinse out the bottles and jars with boiling water.
You do not want any dirt or other particles infecting your brew.
B. Bring 7 cups of filtered or distilled water in the stainless steel or glass pot to a boil.
Remove from heat, stir in the 1 cup of organic cane sugar and place the 8 tea bags in to steep for 15 minutes. Then take out the tea bags.

C. Pour in an additional 7 cups of filtered or distilled water to cool down the hot mixture. Let set aside until it reaches room temperature.
*Note: The Scoby must have a food source, which is the organic sugar in the first fermentation, and fruit or fruit juice in the second. The Kombucha will have very little sugar in it after the first and second fermentations.
D. After the tea has cooled down to room temperature, carefully pour it into the glass gallon jar.
E. Pour in your Scoby and the 1 to 2 cups of starter tea.
(the Scoby will either float, sink to the bottom or somewhere in-between, all are just fine)
E. Cover your jar top with the cotton cloth and secure with a rubber band.
(The Kombucha needs air, but we want to keep fruit flies and other contaminants away)

F. Somehow label the date on your Kombucha Jar
You may think that you can remember the date, but life happens, and its better to be safe than sorry.
G. Set in a warm area of your house where it will be undisturbed.
H. After seven days check your Kombucha:
1. Your Mama Scoby (original scoby) should be producing a baby on top of itself, that will expand to the diameter of your jar

(Yes, it looks like an alien, lol, but this is normal! Each Scoby can have different features.)
(Don't freak out if your Scoby mama and baby are freaky looking, most likely it's a normal and healthy Scoby. Yeast and good bacteria should be growing. If you have questions if what you see is normal, please google it and/or check youtube videos. Most likely though, if it isn't fuzzy, then it's fine).
2. Check the taste of your Kombucha by pushing a clean straw (again, make sure it wasn't washed with anti-bacterial soap) off of the side of the scobies, down into the liquid. Plug your finger over the straw to trap some liquid (about and 1 to 2 inches), take it out and drink it.
a. It should be tangy and have a slight "zing" to it, possibly even some fizziness.
b. At this stage it could still be slightly sweet, or not sweet at all.
3. Your Kombucha is ready for the 2nd Fermentation if:
a. The baby Scoby is fully formed across the diameter of the jar.
b. The Kombucha does NOT taste sweet
Other changes that might occur: the liquid is lighter in color as it was when you first brewed the tea; there may be floaties in the tea (that's a good thing, nothing to worry about).
4. If your Kombucha is not ready, that's fine, mine usually isn't until after day 10, and can take as long as 30 days to ferment. A lot of the timing depends on the temperature in the spot you're keeping the Kombucha. Note that it will most likely take longer in wintertime.
DIRECTIONS TO SECOND FERMENTATION
A. Wash your hands with soap that is not anti-bacterial, rinse and dry well.
B. Gather your supplies: and make sure they are very clean
bottles
a medium sized glass bowl
something to dip with (measuring cup or soup ladle)
plastic funnel
C. Gather your flavoring ingredients of choice
fruit (fresh or if using frozen, defrosted)
organic fruit juice
herb or flavored tea, already brewed and cooled
D. Reach in with clean hands and remove all the Scobies and place it into the glass bowl and then dip out 1 to 2 cups of tea. Set aside to start a new batch later.


(look how this mama Scoby produced a baby the same size!)
E. Add 1/4 cup to 1/2 cup of fruit or juice to each bottle
*Remember if using cut up fruit, to use a wide mouth bottle, otherwise it may be hard to get out later.
I suggest starting out with one to two flavors per bottle. Through experiment, I have noticed that we like the flavor and zing of adding a 1"x 1/4" x 1/4" of ginger to each bottle in addition to it's main fruit. Remember which fruits you add so you can label the bottles later.


E. Using the funnel, carefully fill each bottle, until an inch to 1 1/2 inches remain.

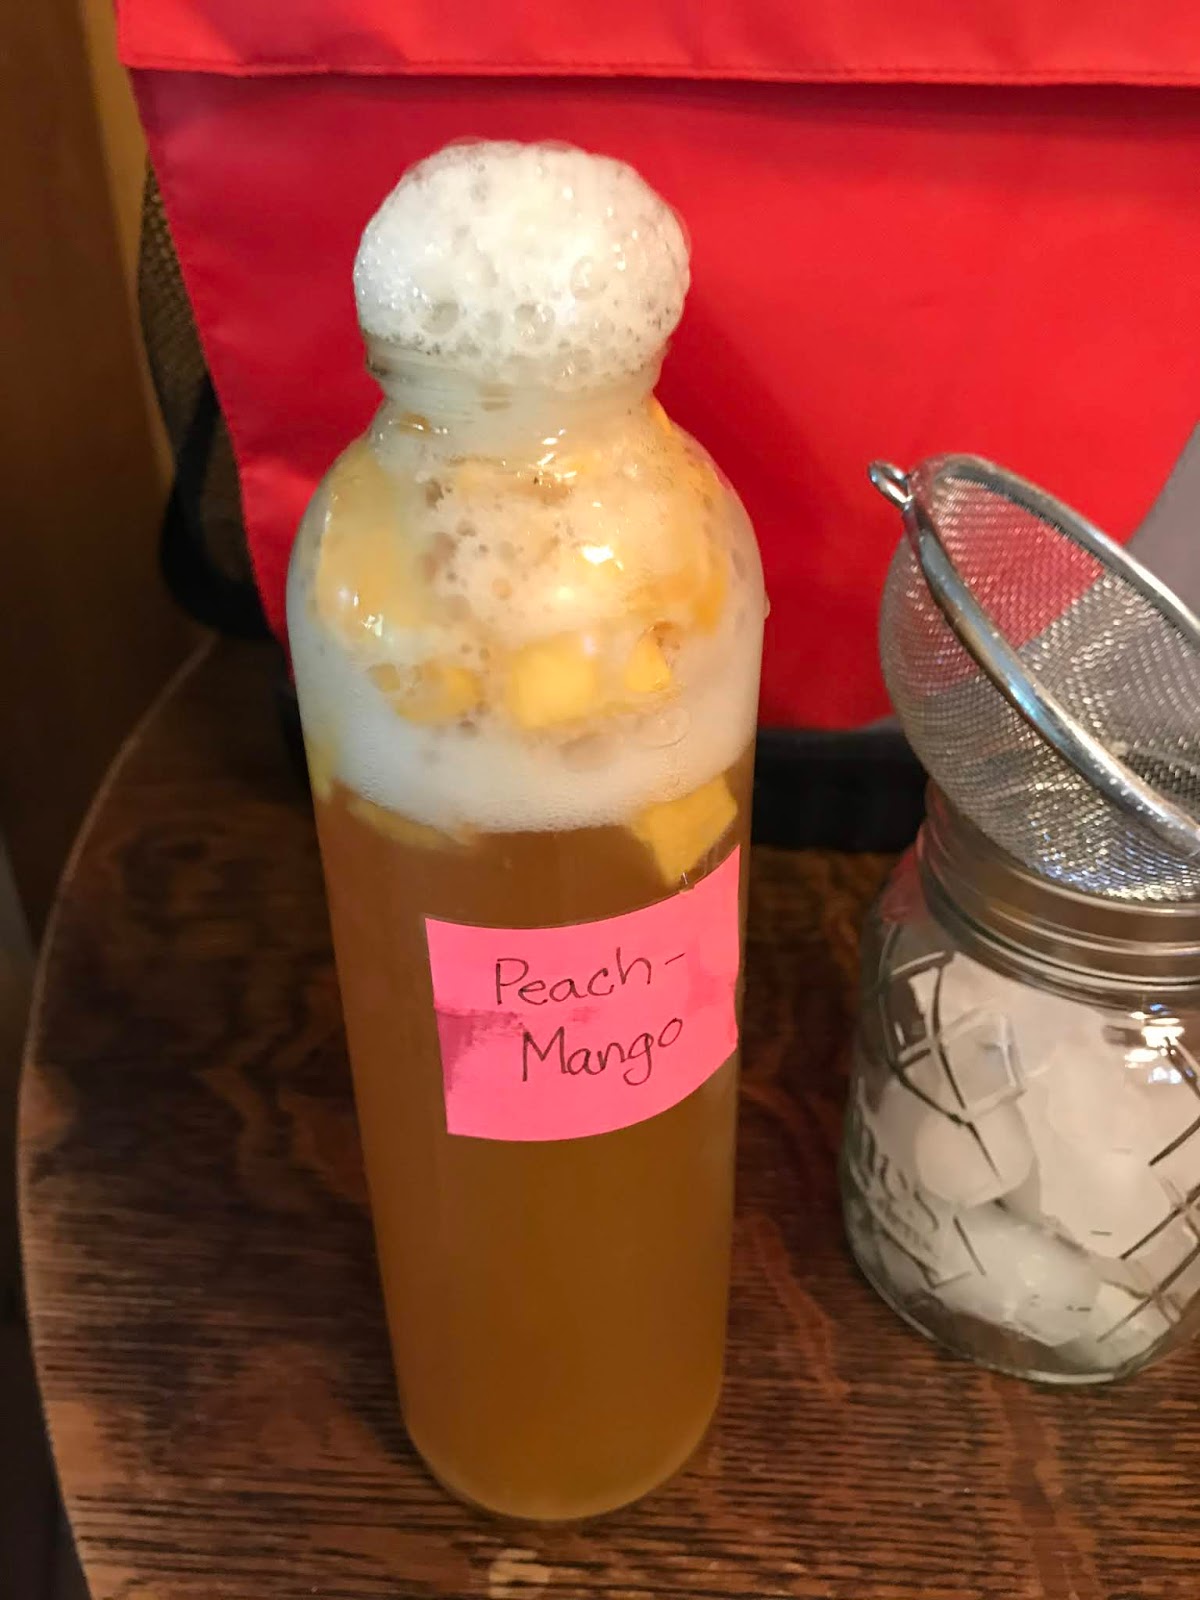
F. Seal each bottle tightly and label the flavors (and the date)


G. Set the bottles aside in a warm place to ferment for 3 to 7 days.
I put mine in a cooler with the lid on due to the bottles, if over carbonation occurs, can explode. This will contain the mess. I haven't had this happen, but others have.
H. Now you need to use your Scobies in the bowl, to make another batch of Kombucha in the jar that you just emptied. Just Go back up to the "DIRECTIONS TO FIRST FERMENTATION"!

CHECKING YOUR BOTTLED KOMBUCHA
A. After three days, open one of the bottles over the sink (trust me on this)
If it bubbles up wildly, it's ready! If not, no worries, just check everyday until it is.
B. As soon as one is ready, I assume all of the same batch are. It is very important to refrigerate them at this point, to stop fermentation. Otherwise they will continue to grow more sour and carbonated and will explode.
C. I recommend waiting until they are chilled, popping one open and pour over ice.
WHAT HAS IT DONE FOR ME?
I've only been drinking Kombucha for about a month. I already "feel" so much better! My stomach and digestive system has not given me any problems since I started. I don't feel like taking naps anymore. Another added benefit: I've been able to quit coffee. Not that I was trying to, just that with drinking Kombucha (as well as juicing vegetable and fruit drinks), I just don't crave coffee anymore. Which is good, because, although plain black coffee is actually good for you in moderation, I had to drink my coffee with a non-dairy, Caramel Macchiato creamer which was "so" not good for me, yet tasted great. So I was putting a whole lot of chemically processed "yuck" in my body every morning. In the past three years, I have only been allowing myself a soda pop (Coke or Rootbeer) about every two to three months. Yet everytime I would have it, I later felt terrible. I no longer crave pop, I guess the tartness and the carbonation of the Kombucha has curbed that. I also feel fuller if I drink Kombucha before a meal, therefore I eat less. Overall I give Kombucha 5 stars!
KEEP CALM AND KERRI ON! Cheers!


